Posts
![]()
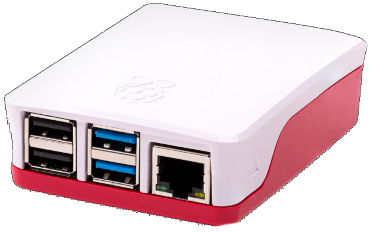
I have been running a Plex server here at home for a long time, on a headless Raspberry Pi server. It’s a great media server for the home, and they very kindly offer both free and paid versions. Everyone looking to have a small, dead simple to use streaming server in the home should check them out.
Plex is good at streaming movies and music and I use it for those things a lot. It also supports Photos and home videos, but it’s not so great at doing those things. There’s been a thread on their forums for a number of years now with lots of users asking when the performance of this feature might be improved but as of the current version, it’s still not acceptable. I have something like 30,000 pictures and home videos in my library for instance and it’s just too darn slow to access those via the Plex interface.
So I looked around recently and decided to give Piwigo a try. It’s also a free, open-source project but it just focuses on providing a streaming server for photos and small videos. It seems that lots of organizations and professional photographers run Piwigo servers out in the cloud and so running it here at home seems like a good solution for me too.
I double-checked that others had set it up to run on a Pi, and figured it would be worth the effort to try it myself. I found this page to be very helpful for doing this but it’s about 6 years old and so some of the info there is out of date.
Here there are the steps I followed this week to get Piwigo 2.10 installed and running on my Raspberry Pi 4 (wth 1GB RAM). This should work for anyone, I would think, but to be clear, I’ve only tested this once, myself.
With these steps, we’ll use NGINX and PHP 7 and MariaDB since Piwigo requires those dependencies to be installed. Just getting those things setup correctly was most of the work; actually installing Piwigo and configuring it is dead-simple.
Let’s go!
-
Start with the Raspbian OS v10 (aka “Buster) installed on the Pi and get it connected to the internet.
-
We’ll enter these commands at a terminal (aka command prompt) on the Pi so get in there and get ready.
-
Create a user for use with Nginx:
sudo groupadd www-datasudo usermod -a -G www-data www-data -
Let’s install some new software or make sure it’s up to date in any case:
sudo apt-get updatesudo apt-get install nginx php-fpm php php-mysql php-pgsql php-imap php-pear php-ldap php-gd php-imagick php-curl php-mcrypt php-pspell php-xmlrpc php-cgi php-auth-sasl php-net-smtp php-xml php-mbstring -
We’re going to give your new web server a SSL Certificate and we’ll just generate it here on the Pi but first we need some software which can do that:
sudo apt-get install openssl ssl-cert -
MariaDB is the database we’ll use. It split off from the MySQL project not too long ago.
sudo apt-get install mariadb-server -
Generate the SSL certificate now and store it in the path where it will be useful.
sudo openssl req $@ -new -x509 -days 730 -nodes -out /etc/nginx/cert.pem -keyout /etc/nginx/cert.key- You can enter through most of the prompts from
opensslfor things like Organization name, etc… but give it your email address.
- You can enter through most of the prompts from
-
Set the file permissions on the certificate files so only web server can read them.
sudo chmod 600 /etc/nginx/cert.pem ; sudo chmod 600 /etc/nginx/cert.key -
Now we’re going to configure nginx. Backup the config file before you start editing, to be safe.
cp /etc/nginx/nginx.conf /home/pi/nginx.conf.BACKUPsudo nano /etc/nginx/nginx.conf -
Add or set these lines inside the “http {” block somewhere:
server_tokens off; client_header_timeout 10; client_body_timeout 10; keepalive_timeout 10 10; send_timeout 10; gzip on; gzip_disable "msie6"; gzip_min_length 1100; gzip_vary on; gzip_proxied any; gzip_comp_level 6; gzip_buffers 16 8k; gzip_http_version 1.1; gzip_types text/plain text/css application/json application/javascript text/xml application/xml application/xml+rss text/javascript; -
NB: Do not include those “gzip” lines if your nginx.conf file already includes a gzip_types line.
-
From now on, every time you’re done editing a text file, press Ctrl-X, type Y and then press Enter to finish and close the editor.
-
Edit the FPM Pool configuration next. (Note that we got the latest PHP version above and so your version may not be 7.3 like mine is now)
sudo nano /etc/php/7.3/fpm/pool.d/www.conf -
Uncomment/add these lines if missing:
listen.owner = www-data listen.group = www-data -
While you’re in there, change this line: listen = /var/run/php5-fpm.sock to read like this: listen = 127.0.0.1:9000
-
Edit the Nginx default config for your web site:
sudo nano /etc/nginx/sites-available/default -
Add this to the end within the “Http {” block. With this we’re enabling FastCGI (via PHP) which should help improve performance)
server { listen 443 ssl; server_name 192.168.XXX.XXX; ssl_certificate /etc/nginx/cert.pem; ssl_certificate_key /etc/nginx/cert.key; # Path to the root of your installation root /var/www/piwigo; client_max_body_size 1000M; # set max upload size fastcgi_buffers 64 4K; index index.php; error_page 403 /core/templates/403.php; error_page 404 /core/templates/404.php; location = /robots.txt { allow all; log_not_found off; access_log off; } location ~ ^/(data|config|\.ht|db_structure\.xml|README) { deny all; } location / { # The following 2 rules are only needed with webfinger rewrite ^/.well-known/host-meta /public.php?service=host-meta last; rewrite ^/.well-known/host-meta.json /public.php?service=host-meta-json last; rewrite ^(/core/doc/[^\/]+/)$ $1/index.html; try_files $uri $uri/ index.php; } location ~ ^(.+?\.php)(/.*)?$ { try_files $1 = 404; include fastcgi_params; fastcgi_param SCRIPT_FILENAME $document_root$1; fastcgi_param PATH_INFO $2; fastcgi_param HTTPS on; fastcgi_pass 127.0.0.1:9000; # Or use unix-socket with 'fastcgi_pass unix:/var/run/php5-fpm.sock;' } # Optional: set long EXPIRES header on static assets location ~* ^.+\.(jpg|jpeg|gif|bmp|ico|png|css|js|swf)$ { expires 30d; # Optional: Don't log access to assets access_log off; } } -
Let’s give Piwigo a home folder:
sudo mkdir -p /var/www/piwigosudo chown -R www-data:www-data /var/www -
Let’s run a quick test to see if this is all working now.
sudo nano /var/www/piwigo/test.php -
Paste in the following:
<?php phpinfo(); ?> -
Save that file and exit Nano.
-
Restart the services:
sudo /etc/init.d/php7.3-fpm restartsudo /etc/init.d/nginx restart -
Test loading the page in a browser on some computer with a screen on the same local network (replace the IP address with your server’s):
https://192.168.x.x/test.php -
This should show the standard PHP Info page with lots of details.
-
If that works, you can remove the test PHP file now (it’s a bad practice to leave PHP files laying around):
sudo rm -f /var/www/piwigo/test.php -
Let’s setup the MariaDB database and permissions:
sudo mysql -u root -p -
Then, once inside the MYSQL prompt, enter these commands:
create database piwigo;grant all privileges on piwigo.* to 'gallery'@'localhost' identified by 'YOURPASSWORD';<— replace with your passwordflush privileges; \q; -
That
\qshould quit you back to the linux prompt when it’s done. -
If you will run this instance on a public internet facing computer, you should run this command next and answer all of its prompts: (I run it even though my server is inside my home only)
sudo mysql_secure_installation -
Alright, let’s get Piwigo!
cd /var/www/piwigosudo wget http://piwigo.org/download/dlcounter.php?code=netinstall -O netinstall.phpsudo chown www-data:www-data netinstall.php -
Now, let’s setup some more config:
sudo nano /etc/php/7.3/fpm/php.ini -
Set these lines with these values:
upload_max_filesize = 1000M post_max_size = 1000M max_file_uploads = 20 -
At the end of the same file, add the following:
upload_tmp_dir = /tmp extension = apc.so apc.enabled = 1 apc.include_once_override = 0 apc.shm_size = 256 -
Almost there. A little more Nginx config is needed:
sudo nano /etc/nginx/nginx.conf -
Set these lines with these values:
client_max_body_size 20M; client_body_buffer_size 128k; -
Restart the services for the last time:
sudo /etc/init.d/php7.3-fpm restartsudo /etc/init.d/nginx restart -
Install piwigo via its very cool NetInstall UI in a browser:
URL: https://192.168.X.XXX/netinstall.php(replace the XXs in the address with your own IP address)
-
Set the DB user name/password, Piwigo user name/password, etc… - See the Piwigo Documentation for help.
-
Save and you should be all set!
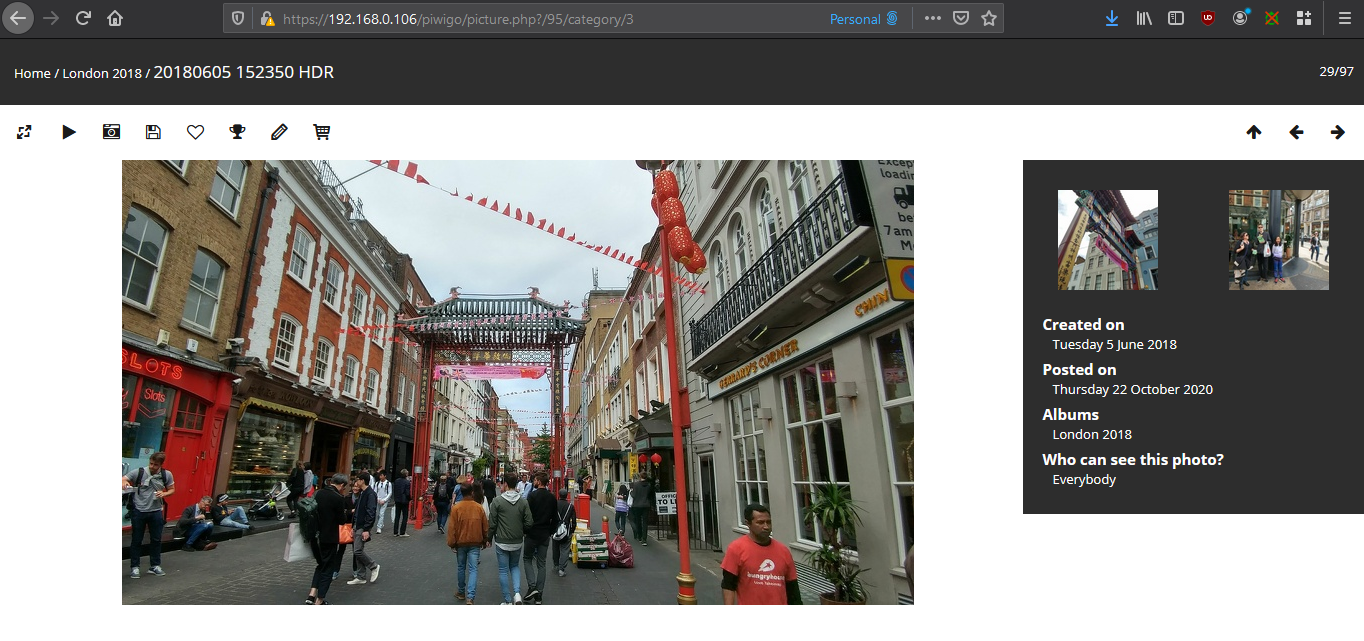
You should now be able to browse to your new instance of Piwigo and check it out from there. My Piwigo instance is working well so far and it’s for sure faster than Plex was. There are a lot of settings you can tweak once it’s installed and Plug Ins to try out, to get it running just as you need. I might write about which settings and Plug Ins I end up with sometime soon.
I hope someone else finds this useful. Thanks to the Piwigo authors and community for a great application.
Enjoy! :)
Nov 17 2020 A message from David:
Thanks for posting this great writeup. One step that confused me for a bit was the first time editing Nginx.Conf. The lines can’t just be added to the end of the file, they need to be wrapped inside the “Http { " portion and most of the lines already existed just needed to be enabled by removing the “#” sign. The next step for me is to figure out how to store the photos on an external drive.
You’re welcome, David. Thanks for stopping by! Yes, editing the nginx.conf is one of those things that’s both tricky, and not super well documented. I’ve updated that section in my write-up here. And, this page should help you figure out how to change the ‘upload dir’: https://piwigo.org/forum/viewtopic.php?id=16518 Cheers!
And, Roberto V wrote to me and said:
I want to try piwigo on raspberry pi4 and i follow your guide, but i have this error : pi@raspberrypi:~ $ sudo /etc/init.d/nginx restart [….] Restarting nginx (via systemctl): nginx.serviceJob for nginx.service failed because the control process exited with error code. See “systemctl status nginx.service” and “journalctl -xe” for details. failed!
For that, I wonder if David’s tip above would help you. Otherwise, I think you’ll need to post the question over at the Piwigo forums to get better advice than I can offer. (Sorry I can’t offer help on this!)
https://piwigo.org/forum/index.php
Good luck, Roberto!
Nov 27 2020 Another message!
Dear Peter, thank you for the excellent tutorial on Piwigo. Without it I would never have managed to get this working within the 1,5 hour it took me to get to work tonight. One thing that might be helpful to others; when
sudo /etc/init.d/nginx restartfails, use:sudo nginx -tto find out the cause of error. The “http” part is a bit confusing. It suggests to add an extra “http” block in the default file, which is not necessary. Adding:keepalive_timeout 10 10;led to an error for me, because after that it was defined twice. All simple to figure this out once you run sudo nginx -t regards from Leiden, Netherlands.
Dank u wel, Han! That’s all good info for everyone reading this page. I didn’t know about the -t nginx parameter but I’ll use that from now on.
Dec 20 2020 A message from Andrew:
Hi! I’m working through your write-up… I keep getting stuck on the PiwiGo installation screen with the message: “Cannot connect to server” … Any ideas?
Hey there. Sorry, but that’s not a lot of info to go on. Assuming you’ve already double-checked all the steps and pre-requisites in the post, then I’d suggest you could reach out at the Piwigo forums to get help with that message. Good luck! (And let me know if my post has bad info and I’ll fix it!)
Dec 28 2020 A message from Kozmik:
Excellent post. Wonderful update on the old tutorial. I have a note, though. You instructed readers to add lines to nginx.conf with no mention of placing them in the “Http {” block. You later instructed them to add a server block to the “default” file, exhorting them to pay be sure to add it to a “Http {” block. Unless I am missing something, this seems to be the opposite of what we want to do. Thanks again for your efforts. This made the installation a lot easier.
Hey Kozmik, thanks for reading and replying on this post! (I mostly just post for my own future reference but seeing others get something from this has been great too) On your questions, the parts of the post where we add the lines from “server_tokens off” down to the gzip lines do belong in the nginx.conf file, as written but I just now noticed that this file does have the same “http {” section as we use further down in the instructions. So I’ve added a note about that to this page now.
How you configure your nginx sites from there can vary though, so you might not want to put those lines I identified as belonging in the “http {” section of the /etc/nginx/sites-available/default file exactly the same, but that worked for me. In general, these kinds of projects take a certain amount of ‘flexible thinking’. I hope you got your install up and running – and everyone reading this should do what they can to support the Piwigo team for their awesome work on the software!
Jan 10 2021 A message from Jonas:
Thanks for the great tutorial, I followed the steps and after some tweaking I eventually got Piwigo running. I have one question regarding performance. My Piwigo is currently running on a Raspberry Pi 2 and has some struggles to render different image sizes for the preview after uploading new pics but performs fine afterwards. Is this any different on the Pi 4? How is the performance in general on a Pi 4?
Hi Jonas, you’re very welcome. I’m amazed and very glad to see others are finding this page useful. I run my instance of Piwigo on a Pi4 with 1 GB of RAM and I’ve seen the same delay you mentioned. It is longer for more pictures, of course, but then, as you said, once it’s had time to create thumbnails (about 30 - 60 seconds on average), it runs very fast indeed. Onec I have those thumbnails, going from one screen of pictures to the next is generally like 1 or maybe 2 seconds occasionally. And just to be clear, that same Piwigo is also running other software, including Deluge and Plex and CherryMusic, though I only usually access any one of those at any one time. Thanks for stopping by!
Jan 23 2021 A message from Stefan
Hi, thanks a lot for this tutorial. I am using a Raspi 1B with DietPi and Lighttpd and not NGINX. What do I have to do to get Piwigo working together with Lighttpd? Unfortunately, I failed installing Piwigo. I don’t understand this command: ~# http://...netinstall.php Is there something like: sudo apt-get piwigo… ? Thanks for your answers and kind regards.
Hi Stefan, thanks for reaching out and I bet we can find a way to make this work. I’m not very familiar with lighttpd yet but I think it can handle this, based on a quick review just now. You know how solving a problem like this is mostly about knowing the right search terms to use? That’s been my experience at least.
What we need to know in this case is that Piwigo doesn’t get distributed like most apps we run on a Pi. There is no apt-get package for it, yet at least. Instead, it runs as set of code files executed by PHP and “FastCGI”. That is a protocol the PHP code uses to interact with the web server. It’s fast and efficient, like a modern web app should be. So that’s why my instructions above spend so much time on setting up that stuff on the computer, and not much time on actually setting up Piwigo. We have to get just the right versions of those things installed and then we configure the web server (nginx in my case, lighttpd in yours). And then getting Piwigo running on those things should be pretty simple. That’s what the netinstall.php script does, in fact. But we can’t run that until we have FastCGI talking to the web server.
So, what you need is to know how to substitute lighttpd for nginx everywhere in the steps above and it all should still work. I just now searched for “lighttpd and fastcgi” and I found this article:
https://www.cyberciti.biz/tips/lighttpd-php-fastcgi-configuration.html
That seems like a good place for you to start in figuring out how to get this all working. The combination of PHP, FastCGI and a MariaDB seems very popular, so I believe you should be able to get this going. If you do, I think it would be fantastic if you could document the steps somewhere for the rest of the community! I wish you good luck. Let me know if I can help any further. Have fun!
Feb 11 2021 A message from Yash:
Hi Peter, I saw your post about installing Piwigo on your RP4. Seems like it works perfectly for photos and thank you for such a great write up. I know that Piwigo has an extension to play videos called “piwigo-videojs”. How does the Pi handle video playback?
Thanks Yash! it does work very well, but I don’t know about “perfectly”. :) We always have some additional things we wish software could do, right? As for videos, I have not yet tried that extension but I’ve had it on my to do list to find a solution for videos on Piwigo. It’s really hard to predict how well a Pi 4 (for instance) can handle this, though they do really well directly playing video from files, so this might work out OK. This extension seems like the best option in the Piwigo extensions list, so I will try it out ASAP and report back here on my results. Thanks for the tip!
March 16 2021 A message from Adam:
Thanks Peter, got further in this tutorial than any other. I’m also stuck at the installation website where it’s saying “Can’t connect to server”. I know that this is almost impossible for you to fix without any further info, but is there some kind of log or debugging I can do to try to work out why it can’t connect?
Hi Adam, this is tough, isn’t it? I’m sorry I won’t have specific help for you. I think you want to start by just double-checking everything you’ve done so far. You might think of something that needs to be re-done, for instance. And if that doesn’t help, then try searching in the Piwigo forums for this message and see what you can find there. There are a number of posts already from other folks who also got stuck at this step, so that might help. Good luck!
March 16 2021 A message from Iain:
Hi Peter. Typo correction in piwigo install steps, “grant all on piwigo.* to ‘gallery’@’localhost’ identified by ‘YOURPASSWORD’; <— replace with your password” should be “grant all privileges on piwigo.* to ‘gallery’@’localhost’ identified by ‘YOURPASSWORD’; <— replace with your password”.
Right you are, as confirmed on this MariaDB documentation page. I’ve fixed this in the post above now. Thanks very much for helping make this page better, Iain!
March 20 2021 - A message from David:
Buenas tardes Peter. Muy interesante tu Post. Yo llevo unos meses con una biblioteca metiendo fotos porque tengo también entre 30.000 y 40.000 fotos. He visto interesante el tema de seguridad que tú añades que yo no lo tengo así. Yo lo tengo instalado en Docker. Lo siguiente que tengo pendiente es el tema de los vídeos que he visto que también han comentado. Por otro lado si vería muy interesante saber cómo hacer una copia de seguridad para poder migrar a otra instalación si decidimos cambiar de equipo. Sabes algún tutoríal interesante al respecto o tienes pensado hacer alguno? Muchas Gracias
Which, translated into English by DeepL says:
Good afternoon. Very interesting your post. I’ve had a library for a few months now with photos because I also have between 30,000 and 40,000 photos. I have seen interesting the security issue that you add that I do not have it that way. I have it installed in Docker. The next thing I have pending is the topic of the videos that I have seen that you have also commented. On the other hand if I would see very interesting to know how to make a backup to migrate to another installation if we decide to change computers. Do you know any interesting tutorial about it or do you plan to do any? Thank you very much
Thank you, David, for your kind words. I’m glad you found the article interesting. I learn as I write these posts, so its helps me too. I do not know much about backing up Piwigo right now, but it’s always important to make sure your data is backed up, for sure. I did some quick reading on this, and I have a couple of thoughts:
-
Since Piwigo takes your photos and imports the metadata into its database and stores the files on the server (Ras Pi or docker or whatever), I think the best answer is to backup your files before you import them into Piwigo. In other words, use Piwigo as the main interface for working with the photos once they’re imported, but keep your own totally separate copies somewhere else too. I don’t think it’s necessarily a good practice to pull your files back from Piwigo and make backups from those folders. You can start if you need by finding your ‘upload’ folder on your server. You should have a symlink in the ‘piwigo’ app folder to a folder with that name - upload. That’s where your photo and video files are stored.
-
As for moving your Piwigo instance to a new server, there’s this post where someone was doing just that: https://piwigo.org/forum/viewtopic.php?pid=151715#p151715. See if that helps.
As I’ve said before, I’m no Piwigo expert, and the product’s forums are a better place to ask questions if my page here doesn’t work for anyone, or you have questions about running Piwigo once it’s installed. Good luck David & everyone!
May 13 2021 Correction on the usermod command line - thanks Matthew B!
Nov 5 2021 - A message from Matthew B
I had the same error as Roberto V when running:
sudo /etc/init.d/nginx restart
I worked out the problem, by checking the nginx configuration with
sudo nginx -t
It turns out that some of the lines added to the http section of /etc/nginx/nginx.conf are already present, and an error occurs when duplicated. The lines that already existed that I had to remove were:
keepalive_timeout 65;
server_tokens off;
gzip on;
After fixing that, nginx restarted with no error :)
Thanks for letting us all know, Matthew!
Dec 31 2021 - In a message I received from metallinux, they pointed out that the last gzip line in the nginx.conf file had application/xml twice - I fixed that. And they also pointed out that the whole gzip section might already be included in the .conf file, so I added note about making that optional, depending on what you see in your own file.
Cheers Metallinux for the update & the tip!