Posts
Displaying your Raspberry Pi’s Temperature on its home web page
Hi again Raspberry Pi fans. I recently figured out how to determine the core CPU and GPU temperatures for my new Raspberry Pi 4 by way of a shell script, and it didn’t take long before I got tired of running that manually. So I then figured out how to get the Pi’s html home web page to include that info. Here’s what that looks like now that it’s all setup:
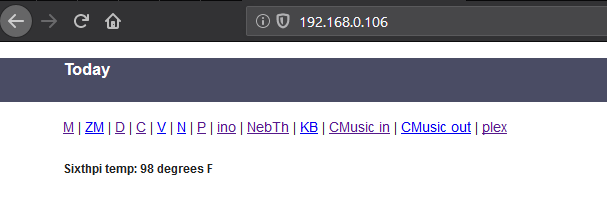 A cool 98 degrees Fahrenheit
Here’s an overview of the process first:
1 - Write a shell script to get the temp and save it into a text file.
2 - Run that on a regular basis via cron (a crontab file really).
3 - Add some JavaScript and HTML to the Pi’s web page which reads that text file and then adds that info to the page.
And here are the details (these steps assume you have Raspbian running as the operating system on the Pi but if not, you will need to adjust to use whatever text editor or other things you have)
-
Get yourself into the Pi user’s home folder:
cd /home/pi -
Execute this command to create the shell script:
nano checkTemp.sh -
Add this script in the nano text editor:
#!/bin/bashecho ""# get the CPU temp in Celsius as a numbercpu=$(</sys/class/thermal/thermal_zone0/temp)# Display the GPU temp in Celsius as textecho "GPU => $(/opt/vc/bin/vcgencmd measure_temp)"# convert the cpu temp to Fahr.far=$(echo - | awk -v cpu=$cpu '{print cpu / 1000 * 9 / 5 + 32}')# round that number to at most two decimalsfar2=$(echo - | awk -v f=$far '{print int(f * 100) / 100}')# convert the cpu temp numbercel=$(echo - | awk -v cpu=$cpu '{print cpu / 1000}')# round that number to at most two decimalscel2=$(echo - | awk -v c=$cel '{print int(c * 100) / 100}')echo "CPU => $cel2 C or $far2 F"echo ""currentdatestamp=``date +"%A, %b %d, %Y %I:%M %p"`` message="Pi temp $far2 degrees F - as of "echo $message $currentdatestamp > /home/pi/www/html/pitemp.txt -
That script:
- gets the Pi’s CPU temperature from a system file under /sys/class/…
- and the GPU temperature from vcgencmd (in Celsius),
- then converts the CPU number to Fahrenheit (for Americans like me) with help from the ‘awk’ utility, since a bash script by itself can’t do floating point math.
- It then rounds that value to at most two decimals
- then saves that value out to the /www/html/pitemp.txt file.
- And it also echoes the same values out to the terminal, in case you ever run the bash script manually.
-
Once you’ve got all that in the nano screen, press Ctrl-X and then type Y to save the file and exit nano.
-
Run that to test it and make sure it’s working as you want:
./checkTemp.sh -
You should see the temperature output and there should also be a new file out at the www/html folder.
-
Now we schedule that to be run on a regular basis with cron:
crontab -e -
In the crontab screen, add this line to the end of the listing:
*/15 * * * * /home/pi/checkTemp.sh -
That tells the OS to run the checktemp.sh script once every 15 minutes, on ever day. If you want to tweak that I recommend using the awesome Cron tool at crontab.guru.
-
Again, when you’re happy with that, press Ctrl-X and then type Y to save and exit.
-
Now we just need to add some code to the home page running on the Pi’s web server.
-
If you don’t have one of those setup yet, you probably want to go search for how to set that up and then come back here to finish this setup.
-
Edit your html file or whichever web page you want to add the Pi’s temperature to:
nano www/html/index.html -
In that file, we’re going to use jQuery to read the text file, with something like this:
https://ajax.googleapis.com/ajax/libs/jquery/3.3.1/jquery.min.js -
Then add this block of JavaScript or something very similar to the section:
function getData(){$.get('./pitemp.txt',function(data){console.log('got pi temp:'+data);$('#piTemp').text(data);},'text');}; -
That bit of JavaScript uses jQuery’s ‘get’ function to read the text file and then jQuery’s text function to set that text into the element with the ID of “piTemp” (which is case- sensitive).
-
Now we just need to call that getData() function each time the page is loaded so we do that in the body tag’s onLoad:
<body onLoad="getData()"> -
Then, wherever you want to see the Pi’s temp text, add a tag like this:
<h5 id="piTemp"></h5> -
That just gives jQuery an element with the “piTemp” ID to reference in the JS.
-
Press Ctrl-X, then type Y to save the file and exit nano.
That should get you a web page which shows something very close to your Pi’s current temperature every time you refresh the page.
:)